Soviet interiors are a thing of the past, but what to do with the rest of the furniture? Someone takes it to the dacha to live out the last years, someone mercilessly disassembles and throws it away, and someone restores it! Giving a second life to old, but high-quality things is not only economical but also environmentally friendly! And in addition, you get unique things that will not be found in any other interior.
Pros and cons of do-it-yourself furniture restoration
Why you should choose restoration, rather than taking furniture to a landfill:
- Respect for nature. Alas, household waste is not recycled. Your chest of drawers will rot in a landfill for years to come, especially if you throw it away in relatively good condition.
- Creation. If you like needlework, then restoration will captivate you.
- Saving. Save money in your wallet by not being tempted by trendy furniture.
Exclusivity. You come up with the design, color, and decor – you will not find such furniture in a chain store.
Of course, DIY is not so simple. There are a lot of downsides to the restoration as well. First, you need to spend money on materials: sandpaper, rollers, brushes, paint, and varnish. Then spend a lot of time on all processes. You will also have to learn from your mistakes and master new techniques. Furniture restoration is an occasion to get acquainted with a screwdriver and different sizes of screws, to learn a little more about fittings and the features of different materials.
Restoration is a rather messy process. If possible, work in an area where you don’t mind spilling paint, or prepare your work area by properly protecting floors. Don’t forget gloves and a respirator.
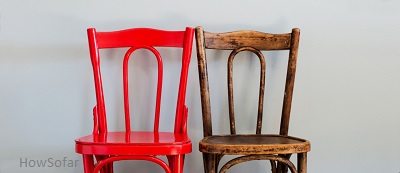
Giving New Life to Old Seats
Before a total rework, take care of the moments of operation. Tighten the hinges, replace the fittings, cover the holes and dents with putty, and replace the mirror on the dressing table. Even updated handles can make a difference in the look of furniture! All this must be done before painting!
We recommend that you soberly assess the condition of the furniture. If it breaks badly, it is better to send it to rest, and if the damage is minor, feel free to get to work.
Do not touch antique furniture and antiques! Acrylic paint does not suit a century-old oak cabinet: vintage is now very much appreciated. Such things are given to professionals for restoration, and if the item is not needed, try putting it up for sale.
Renewal of polished surfaces
When the appearance of the furniture suits you, and you only need to update the shiny layer (polish), use one of the suggested recipes:
- Oil polish. Mix linseed oil, turpentine, and vinegar in a ratio of 2:2:1. While wearing gloves, clean the polished surface with a soft cloth.
- Beer polish. Mix vegetable oil and beer in a 1:1 ratio.
- With wax. Dissolve the wax in beer in a water bath, and mix. Apply to furniture, and leave to dry. Then rub the surface well with a fluffy cloth.
These methods will work if the surface is slightly scratched. Unfortunately, it is impossible to restore chips and large cracks at home.
If expensive furniture is covered with polish, do not experiment. Turn to professionals for restoration of shine: it’s not scary to ruin old furniture, but it will be a pity for an expensive thing.
How to repaint old furniture
An important step is a preparation for painting:
- Plastering all surfaces with sandpaper so that the paint lays evenly. It is most convenient to prepare disassembled furniture.
- Degreasing surfaces with acetone.
- Soil application. This step will significantly improve the result: firstly, the paint “clings” to the surface better and lays down more evenly, and secondly, fewer layers are required to obtain the desired shade.
After preparation, you can paint. Universal coating – water-based acrylic. You can also use the spray can, but not indoors.
A well-cleaned surface can be painted quickly with any tool: even with a roller, even with a brush. The first gives a softer and more even coverage, and with the help of a brush, you can give an interesting texture. In any case, apply at least two coats of paint. After each, it is necessary to wait until completely dry.
We offer two simple staining techniques that are used on all types of furniture so that it does not seem too new:
- Sandpaper aging. Go over the dried paint with coarse sandpaper. It will leave characteristic “age” scuffs.
- Wet technique. Dilute black or gray paint with water to a liquid state, apply liberally to furniture, and quickly blot with a rag or napkin.
How to varnish furniture
When the coloring is completed, make a varnish coat. It protects the paint from negative environmental factors. If the furniture will be used outdoors or on a balcony, this step is mandatory.
Interesting on the topic How to Clean Upholstered Furniture: 6 Tips & Tricks
The choice of varnish depends on your preferences. It is applied with a brush or soft cloth, rubbing a little into the furniture. For durability, make 3-5 layers, each of which dries longer than the previous one. Varnishing significantly increases the time for restoration, but also extends the life of the furniture.

A special craquelure varnish will help to give things a vintage look: after drying, it forms cracks, and an interesting effect of antiquity is obtained.
5 ideas for restoring old furniture
And now five interesting ideas and techniques on how to decorate furniture. All options are quite budgetary and simple to implement.
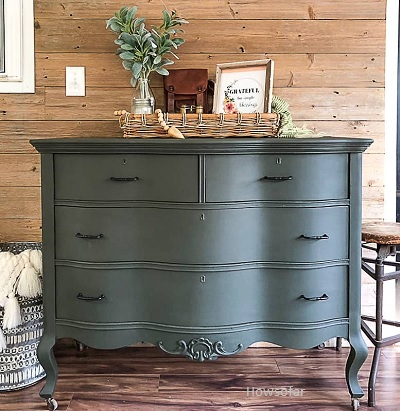
Ideas for restoring an old chest of drawers
Was there embossed wallpaper lying around in the pantry? Decorate with them the entire surface of the chest of drawers or only individual elements, for example, the front of drawers or niches. Glue the wallpaper on PVA, and after drying, cover with at least two layers of clear varnish on top. In the same way, you can glue very small pieces of wallpaper.
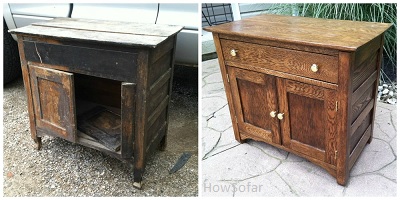
How to update an old cabinet
We suggest experimenting with patterned coloring. To do this, you need two colors of paint and masking tape. After preparing the surface, tape over the areas that you do not want to paint with the main shade with tape, and apply paint to the remaining surface. Let the paint dry, and then remove the adhesive tape and fill in the spots with a different color. Thus, it will turn out to make geometric patterns.
Restoration of an old wardrobe
A large cabinet or wall can be tightened with a special film. It’s less dirty work than painting. If you don’t feel like working with smelly chemicals, this is your option. But keep in mind that the film is less durable and requires careful handling.
Updating an old table
A work or dining table can be decorated using the decoupage technique. This is the transfer of images from paper to the surface using PVA. A very simple and cheap technique that does not require DIY skills. Pictures of vegetables, fruits, and drinks look appropriate on the dining table, and thematic images from magazines on the work table.

The second life of the old dressing table
Dressing table in oriental style from an old dressing table! Paint the furniture the color you want. Then take paints of contrasting colors and prepare stencils. There are special plastic stencils in stores, but you can get by with thick sheets of paper. Fix them to the furniture with adhesive tape and apply patterns.
FAQs
1. Can I restore any type of furniture myself?
Yes, with the right tools and techniques, you can restore various types of furniture, including wood, metal, and upholstered pieces.
2. Do I need prior experience in furniture restoration?
While prior experience can be helpful, DIY furniture restoration projects can be undertaken by beginners as well. Start with smaller projects and gradually build your skills.
3. What tools and materials do I need for furniture restoration?
The tools you’ll need depend on the specific project, but some common ones include sandpaper, paintbrushes, wood glue, upholstery fabric, and basic hand tools like screwdrivers and pliers.
4. How long does a furniture restoration project typically take?
The duration of a project varies based on factors such as the size of the furniture piece, the complexity of the restoration, and your level of experience. It can range from a few hours to several days.
5. Can I save money by restoring furniture instead of buying new ones?
Absolutely! Furniture restoration allows you to breathe new life into old pieces at a fraction of the cost of buying new furniture. It’s an excellent way to save money while adding unique character to your space.
6. Are there any safety precautions I should take during furniture restoration?
Yes, it’s essential to wear protective gear such as gloves, safety glasses, and a dust mask when working with chemicals, paints, or power tools. Additionally, ensure proper ventilation in your workspace.
7. Can I restore antique furniture without devaluing it?
Yes, careful restoration can enhance the value of antique furniture. It’s crucial to research and employs appropriate restoration techniques that preserve the original character and integrity of the piece.
8. How do I choose the right finish for my restored furniture?
Consider the style and function of the furniture, as well as your personal preferences. Stains enhance the natural beauty of wood, while paints provide versatility. Experiment with samples to find the perfect finish.
9. What if I encounter challenges during the restoration process?
Restoring furniture can come with its fair share of challenges. Don’t hesitate to seek guidance from online tutorials, and forums, or even consult with experienced woodworkers or furniture restorers.
10. Is it possible to restore furniture with sentimental value?
Yes, restoring furniture with sentimental value can be a rewarding experience. By breathing new life into these pieces, you preserve cherished memories while enjoying their beauty for years to come.